Saturday, September 25, 2010

Oh what a beautiful morning, Oh what a beautiful day.......

Surprisingly, everything came my way today!!

I showed up @ 8am and met Paul at the local Dunkin Donuts-I only had coffee, no donuts! I swear!!!!
Anyway, Wayne showed up a little while later and set up to needlescale the frame of #35.
Around 9am, Leon showed up and while Paul was busy setting the punch codes of the frame on #35, Leon & I began the final assembly of the turntables braking system.
PaulFloroffstamping35frame.jpg image by THEWINEGUY35
This took quite a while as we needed to re-fit both brake shoes and remove and adjust all of the levers a few times.
LeonworkingonTurntablemotorframe.jpg image by THEWINEGUY35
At 11:30, both Ronnie & Rickey showed up and set about to continue the paint removal on #35's drive wheels. At 12 noon Paul & I had to leave for a meeting. With Wayne needlescaling and Leon now working alone on the brake system, I was astonished when I  returned at 1:30 (with lunch for all I might add) to see that Wayne had cleaned off nearly 2/3 of the frames right side.
Wayneneedlescaling35frame.jpg image by THEWINEGUY35
35FRAMENEEDLESCALED.jpg image by THEWINEGUY35
Leon had completed the brake assembly and after bolting up a couple of parts and adding a few cotter pins, we tested the brakes and they worked nicely.
LeonworkingonTurntablemotorframe.jpg image by THEWINEGUY35
The guys broke for lunch which gave me some time to clean out and ream out a few of the bolt holes so we could begin to reassemble the steel framework for the turntables braking platform.
After studying quite a few photos of the turntable in action, we have concluded that there was a wooden platform that the operator used to stand on that brought him up high enough so he could operate both the brake lever and the controller. This allowed a one man operation of the turntable. Way cool!
Turnatblemotorframesandboxinstallation.jpg image by THEWINEGUY35
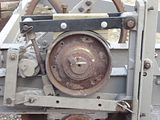
The above photo shows you one of the platforms frame pieces in the upper left corner and you can make out the brake handle to the right of it. Also you will see that we added both of the sand boxes to the frame at this time. Even with the weight of the unit in operation, during inclement weather the LIRR still need to add sand to the ring rail at times, in order to provide traction for the drive wheel.
Leondemonstartingbrakeapplication.jpg image by THEWINEGUY35
Here's Leon testing the brake system. He is holding the long lever which will rise through the wooden platform and here you can clearly see the two pieces of steel going in a vertical position on either side of the brake system. To these parts, Pressure treated (PT) lumber will be bolted and assembled into the platforms frame and a PT deck will be placed on it afterwards.
 
When we called it a day at 5pm here is what the frame looked like after we painted on a light coat of metal primer. Remember it was a LIGHT COAT! This is what we were told to do by the restoration contractor. A light coat will allow anyone to see any cracks that might have developed in the steel of the frame.
35frameinprimer.jpg image by THEWINEGUY35
Where Paul is standing (with his back to us) is where Wayne stopped for the day. He  stopped just to the rear of where the #1 drive wheel would be.
 
Next week, I will be away, but Leon & Wayne will run the work seesion. I can only imagine how far they will get the frame needlescaled and maybe (?) the turntables motor frame assembly will get put into the turntable pit and re-attached to the turntable bridge. I also suspect that my other guys, also known as the "newbies" (Ronnie, Rickey. John, Gerard, Evan, Louis) will continue to get the drive wheels cleaned up.
 
All in all, a fantastic day, workwise and weatherwise.
 
I will be posting late next week as I won't be around until Monday to write up my blog.
Gary
 

Friday, September 24, 2010

Levers and Brakes and trains, Oh My!

Just yesterday morning, I had some good feelings about the day.
Thankfully, they materialized.

A few years back, the Railroad Museum of LI (RMLI) received from the LIRR, a 10 lever interlocking machine that was from Nassau Tower in Mineola. This unit arrived on a well worn out flatcar and also came in with a pair of ALCO power truck side frames.
Before my wedding this past August, I visited with RMLI President Don Fischer to ask about this unit.
A few weeks ago, the Board of Trustees from RMLI voted to deassesion this piece from their collection and RMLI President Don Fischer contacted me to let me know about their decision.
As RMLI already had a working interlocking system installed in their museum (from BLISS tower), they felt it was not necessary to duplicate this display and voted to donate this "ARMSTRONG" interlocking machine to OBRM.


I contacted our friend and supporter Steve Krisman from 5th Industrial, and he was more than happy to assist us at this time.
He asked his friend Bob Flutie from BF trucking to pick up our unit and bring it over to 5th Industrials site where Steve would hold it for us until he could get it up to us.

North Fork Welding & Supply donated a crane to assist RMLI in moving the drive wheels for their #16 BEDT locomotive and while the crane was on site, they rigged the interlocking machine and placed it on Bobs Landoll trailer. But lo & behold, Bob, being the friend that he is to Steve, brought the unit from RMLI's site in Riverhead, all the way up to us in Oyster Bay!

THANK YOU Bob and THANK YOU Steve for making this acquisition happen.

I especially want to  offer a big THANK YOU to  Don Fischer and the Board of Trustees at RMLI for making this OBRM acquisition a reality. A great joint effort that benefits the entire railroad musuem community.

Due to all of the projects currently going on , this project will probably not be started until early next year.
It will demand an inordinate amount of rust removal and major amounts of penetrating oil !!
Here is a picture of the unit after its arrival at OBRM's display yard. I put it next to the turntable so as to have room for the forklift to move locomotive parts and to leave a large empty area where we can eventually lay out the turntable ties, when they arrive.


003.jpg Our new Armstrong interlocking machine image by THEWINEGUY35
During the day, we had many of our volunteers hard at work .
Leon Daitz and Steve McKeon were busy getting the turntable motor braking assembly back together and installed. This unit had been removed about 5 years ago and was disassembled, degreased and had the paint/rust removed.
We needed to remove what was left of the broken off cotter pins from inside of the assembly pins. Not a small job in itself which was easily handled by another of our volunteers, Jeff M. Then all of the pieces were treated to a coat of rust converter, primer and finally, paint.
 Steve McKeon  first came to us as a volunteer from Barry Technical School who has been working jointly with BOCES and OBRM.
He is a talented, master welder and was able to fabricate a cast iron part  for the brake lever onsite. This was not an easy task and he was able to make the part from a spare tie plate that was stashed away on a pallet.
Leon has been with us for many years and can always be counted on for his knowledge and diligent work ethics.
The 2 of them made this unpleasant task almost look too easy!
004.jpg Leon & Steve putting braking system together image by THEWINEGUY35
001.jpg Leon & Steve on parts production image by THEWINEGUY35
One of our newer volunteers, Gerard, was assiting them in assembling some of the parts.Here he is assembling  the brake lever that the operator would use to slow the turntable and align the track so he could align it to the lead track coming in from the LIRR yard with the locking pin.
002.jpg Gerard getting brake lever assembled image by THEWINEGUY35
While this was going on, 3 more of our volunteers were hard at work on the drive wheels.
According to the plan list as outlined by our restoraion contractors, Steam Operations Corp., we needed to clean off the outer and inner bearing surfaces from the drive wheels and preserve the faces with a thin coat of primer. We are also in the midst of removing the primer on the drive wheels which OBRM applied many years ago while #35 was in Mitchel Field. So for the next several weeks, this will be an ongoing project.
The top photo is of volunteers Ronnie Schnepf & Paul Floroff working on the rod bearings-On the bottom is Ricky Imperato hard at work on the bearing faces.
005.jpg Paul & Ronie working on Driver bearings image by THEWINEGUY35
006.jpg Ricky working on Driver bearing faces image by THEWINEGUY35
As always, it is the volunteers who ultimately make the restorations work and I am proud to be able to oversee the workings at the yard.
This next photo may not look like much to many of you, however, this is the first time in around 5 years, that the braking sytem has been installed (and working) on the turntable motor frame assembly.
011.jpg Turntables motor braking sytem assembly going together image by THEWINEGUY35
This assembly is a series of levers and rods which is put into motion by the operator pulling a very long lever which can just be made out in the above photo going up at an angle from the  left side of the power wheel. You can see 2 of the bolts above the black metal strap in the middle of the photo.
We still need to finish up the bottom (wooden) brake shoe. You can easily see the top (wooden) brake shoe which is sandwiched between the 2 black metal straps.
When completed next work session, we will be ready to drop the entire frame assembly into the pit and attach it to the turntable bridge, which had previously been sandblasted and painted by Gallagher O'Rourke Company.
NEXT SATURDAY 9-25-10 will be our General Meeting in the Historic Oyster Bay Train Station on Railroad Ave.
Whew! I am exhausted just reliving yesterdays adventures.
Thankfully, I have the brains of a Scarecrow, the courage of a Lion and the heart of a Tin Man.
Now I just want to get back home. Where is that wizard????
Gary

Saturday, September 11, 2010

A day of remembrance and optimism

Saturday September 11th 2010-


I am flying my flag at half mast today, having put it out at 7am this morning before leaving for the day.
Never forgive, never forget.
Remember the people who gave their lives to save the others who were murdered 9 years ago.

A smaller than avereage turnout today, only 6 of us but what we lacked in hands, we sure made up for in efforts.

The turntable motor frame assembly now has its 2 coats of paint and the entire braking assembly has been given at least 1 coat. Some parts have 2, but next week we will give every part from this assembly another coat and do any touchups needed on the motor frame before we begin reassembly.

We checked the pin that holds the 2 drawbars on #35's frame and it hasn't "popped" loose yet, so we cranked up the jack another notch and gave a few new squirts of Kroil brand creeping oil to the pin between the drawbars and underneath the frame.

Hopefully we will find it loose within the next 2 weeks so we can remove the drawbars and have them cleaned and coated.

One of the chores that we were given in our extensive list of "things to do" by the restoration contractor was to get any of #35's parts off of the ground. We have been a little lazy in the way that we have handled a few of the really large and/or heavy steel parts and have put many of them on the ground.
Hey! they are made of very thick steel so we figured a little time on the ground wouldn't harm them too much. Well, today we took all of the parts and placed them on either side of #35's frame on top of ties or pallets to get them off of the ground.

Next week we will start cleaning, coating and reassembly of the 6 drive wheel bearing box assemblies. These are made up of 7 parts which will only fit into their respective boxes and do not interchange, so it will be a challenge to us. I am sure that it will take up the better part of a day to accomplish this task.

Gary